Wednesday, June 5, 2013

Pinwheel Crib Mobile

When my husband and I were planning out our son's nursery, we wanted to include a mobile for his crib. Every baby needs a mobile, right? As we started searching for one we liked, however, we noticed a few things. First, mobiles can be crazy expensive! Second, there are a lot of really cheesy mobiles on the market. And third, most of the mobiles are designed to be looked at from the side. If you looked at them from the baby's perspective you wouldn't see much! Discouraged, we never purchased one and our son's crib went sans mobile. This wasn't really a problem at first as he mostly slept in his bassinet. Now that he is older and does most of his sleeping in his crib, it really bothered me that he didn't have anything fun to look at. So I did what any crafty mama would do and made him one!


It was important to me that whatever design I chose would be interesting to look at from underneath. The whole point is for the baby to see it after all! After scouring Pinterest and Etsy for ideas I settled on making him a pinwheel mobile. Pinwheels are cute, face downward, and are easy to make. I could also choose pattern papers that complemented his nursery decor.


I went to Michael's and picked out some of their open stock pattern paper in reds and blues. Michael's often runs a sale on their 12x12 paper so I waited for one and got each sheet for 20 cents.


To make the pinwheels I followed a tutorial by Ashley Cannon Newell for one of Papertrey Ink's "Make it Monday" series. She was making pinwheels to put on cards, but I adapted the idea for the mobile and made them larger. I cut my paper into 3 1/2" squares, so that the finished pinwheels measure 4 1/2" across. Aren't they adorable?!


For most of the pinwheels, I adhered two sheets of pattern paper together. I also stitched them together with embroidery thread to make sure they were extra strong and wouldn't come apart. Mixing and matching the different patterns was a lot of fun!


The pinwheels hang from these dowels. I purchased two 3/8" dowels from Michael's and cut them in half. I made nine pinwheels; one hangs from each arm of the mobile and one hangs down the center.


Lashing the four pieces together was a bit tricky. I originally tried wrapping just baker's twine around them, but I couldn't get them stable enough. My brilliant Dad then suggested tacking them with hot glue in addition to wrapping with twine. It worked! I did go back and tuck in the loose ends of twine that are in this picture.


The pinwheels are suspended from the dowels by fishing line. The knot is on the front (as is the knot from the embroidery thread that helps hold them together) so I hot glued a button to the center of each pinwheel to cover it up. I had planned on doing that anyway, to add a contrasting spot of color, but it had the added benefit of hiding the unsightly knots.


I was giddy with excitement when I finished! I think it turned out adorable and I love that it matches our son's nursery. I also love that he has something interesting to look at as he falls asleep and when he wakes up (a bare white ceiling just isn't that exciting!) And the whole project only cost around $2 to make! 

Thanks for stopping by!


Saturday, May 25, 2013

PTI May Blog Hop


I have been meaning to play along with a Papertrey Ink blog hop for ages, and today I finally managed to get my card done in time! The challenge was to use a floral set and one of several provided color combos. I may have cheated a bit by only using one color, though Nicole did say we didn't have to use all of the colors. Ha!

For my card I used Year of Flowers Collection for the floral image and the sentiment is from Wreath for All Seasons.  I started out by stamping the sentiment in Versa Mark ink on a Raspberry Fizz panel, then filled in the flowers around it, also in Versa Mark. Then I embossed everything with white embossing powder. The Raspberry Fizz panel was attached to a Stamper's Select White base with dimensionals and it was finished! I love that it is both clean and simple but has a vibrant punch. Thanks for stopping by and be sure to go see what everyone else created today!

Happy stamping!

SUPPLIES
Stamps: Year of Flowers Collection, Wreath for All Seasons (PTI)
Paper: Raspberry Fizz, Stamper's Select White (PTI)
Ink: Versa Mark
Other: white embossing powder, dimensionals

Friday, May 17, 2013

Embossed Leaf Prints


I have another clean and simple nature themed card to share today. The idea for this card has been rumbling around in my head for a while, and I actually made a few different permutations before getting it where I wanted it. But I am so happy with how it finally turned out!


It is fairly straightforward. The leaves were stamped in Versa Mark ink on a panel of Kraft card stock and embossed in white. I ran the panel through my Cuttlebug with the Linen & Canvas impression plate and then adhered it to a Rustic White card base with foam tape.

If the rain holds off we are planning on going to an outdoor concert in the park this evening. What are your weekend plans? Hope you have a good one! :)

SUPPLIES
Stamps: Leaf Prints (PTI)
Paper: Rustic White, Kraft (PTI)
Ink: Versa Mark
Tools: Linen & Canvass impression plate (PTI), white embossing powder

Tuesday, May 14, 2013

Oak Tree Stationary


Years ago I picked up some blank stationary with lovely deckle edges. I just love a deckle edge, don't you? I sent a few of them to people here and there, but mostly I hoarded them. Any other hoarders out there?
 

But no more! With Father's Day coming up I've been thinking more about masculine themed cards and that is how the idea for this set of stationary came about. The delicate paper of the stationary needed a clean and simple design to complement it. This oak tree image was perfect!


The oak tree is stamped in a dark earthy brown ink. I rarely do such a minimalist design, but I love how these look!


It was also fun to get away from the traditional A2 size format and work with something a bit smaller. These cards measure 3.5"h x 5"w. I made a set of 10 and listed them in my shop

Thanks for stopping by!
Thursday, May 9, 2013

Sweet Baby Tags

There have been some extra die cuts from past projects sitting on my desk for quite a while so I finally decided to put them to use. I had a couple of tags and some animals from Papertrey's Sweet Baby die collection. Put them together and you get adorable baby gift tags! 


This is the first tag I made and it came together very quickly. The little elephant is stamped in Wet Cement ink and the little heart is Pink Pirouette. The elephant is popped up on dimensionals. The sentiment is also from Sweet Baby.


I threaded some pink polka dot ribbon through the top and embellished with a pink button and a twine bow. 


As I had two of the elephant die cuts I also made a baby boy tag. I used Bashful Blue this time and white satin ribbon.


Love this little lion! He is stamped with Daffodil Delight and Really Rust ink. 


Lastly, another lion tag with a slightly different sentiment. These were so fun and easy to put together!  I love dressing up gifts with special tags.  It will be nice to have these on hand the next time a friend has a baby!

SUPPLIES
Stamps: Sweet Baby (PTI)
Paper: Rustic White (PTI)
Ink: Wet Cement (Hero Arts), Pink Pirouette, Bashful Blue, Daffodil Delight, Really Rust (SU!)
Tools: Tag Sale #3 die, Sweet Baby dies (PTI)
Embellishments: buttons, ribbon, twine

Monday, May 6, 2013

Stitched Banner Birthday Cards

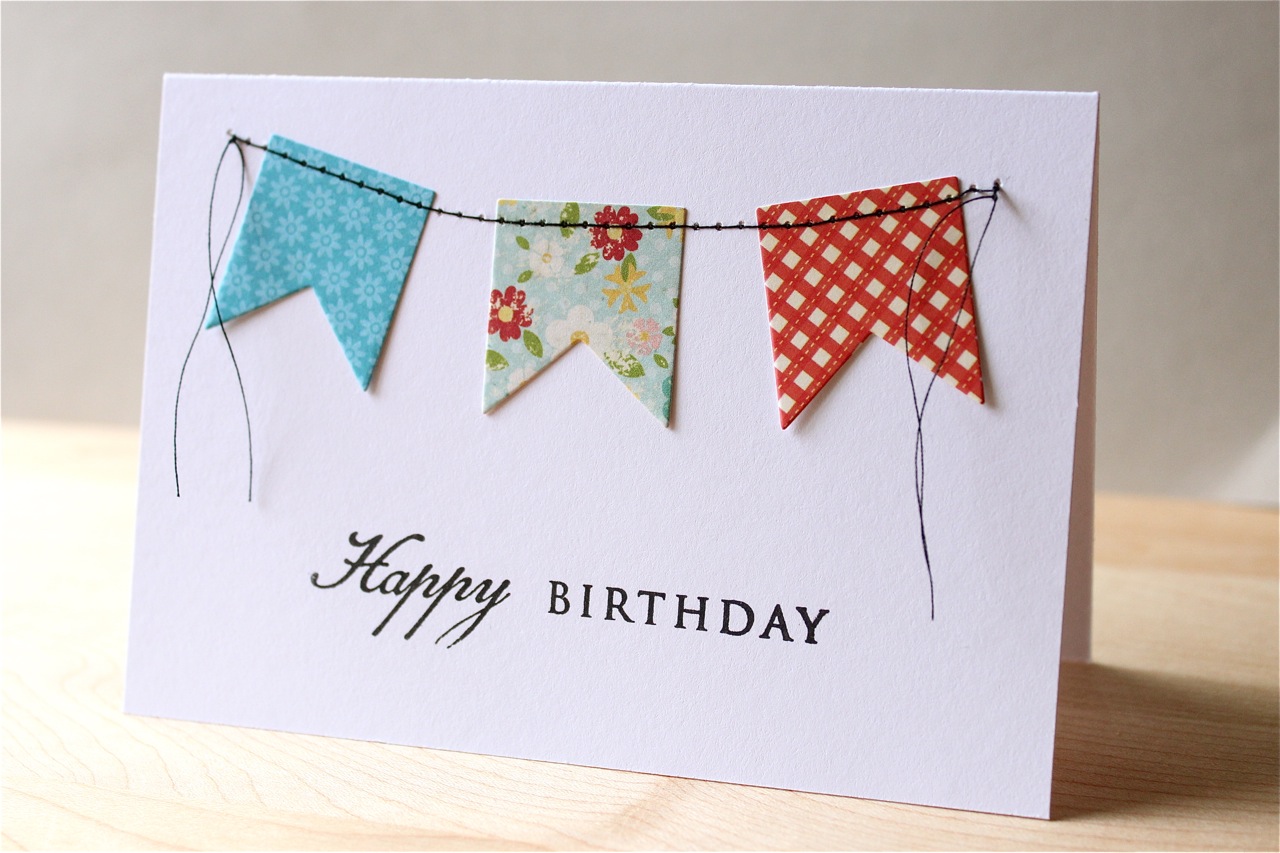
I've been having fun playing with my PTI Banner Builder dies. Seriously love those things! I used the boxy banner shape to cut a bunch of pennants from various pattern papers in my stash. Then I mixed and matched to make some birthday note cards.


I machine stitched the little flags in place so that it looked as though they were strung across the top of the card. I intentionally left the thread tails long to mimic a banner string.


The "Happy Birthday" sentiment is from Wreath for All Seasons, except for this card. This one uses the same font, but it is the larger version from Think Big Favorites #12.


I couldn't stop making them, they were so cute!


I can't decide which one I like best. Which one is your favorite? 

SUPPLIES
Stamps: Wreath for All Seasons, Thing Big Favorites #12 (PTI)
Paper: Stamper's Select White (PTI), various pattern papers
Ink: Onyx Black (Versa Fine)
Tools: Banner Builder dies (PTI), sewing machine

Wednesday, May 1, 2013

Happy May Day


Just popping in with some flowers to wish you all a happy May Day. If we were neighbors I'd love to leave a bouquet on your doorstep, ring the doorbell and run away! Did you ever do that as a kid? Wishing you flowers and sunshine on this spring day! *hugs*