Thursday, February 16, 2023

I Spy the Birthday Boy!


My oldest son recently turned ten (ten!) years old. He has been interested in spy stuff lately so I used some older products from Papertrey Ink to make him a spy themed birthday card!
 

The stamp set I used, Secret Agent, has lots of fun details in it that I used throughout the card and envelope design. The above photo shows the envelope, the outside of the card, and some cool secret agent glasses I made using the Secret Agent Glasses die. 


This is the front of the envelope. The glasses are die cut from both black card stock and black fun foam to make them sturdy enough to play with. 
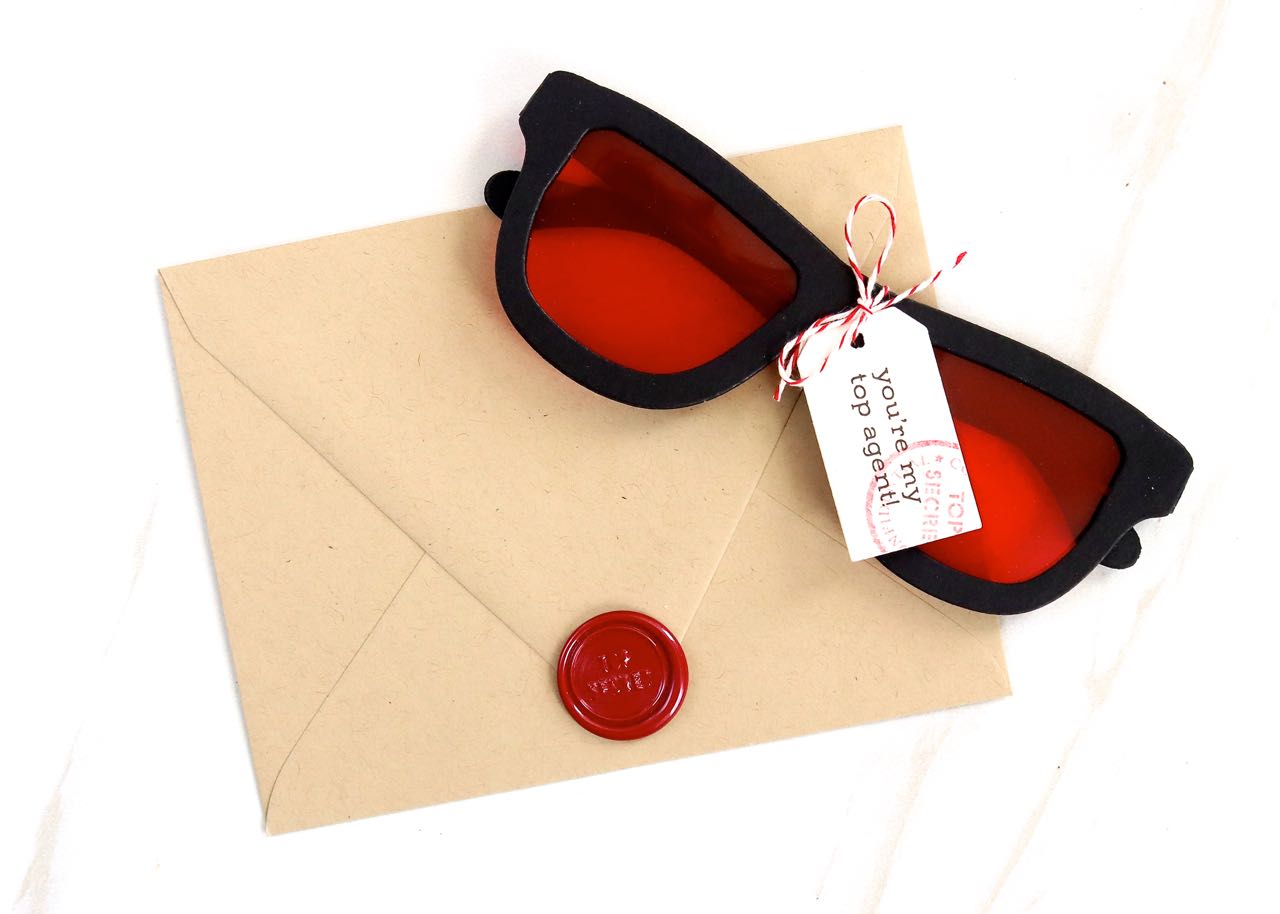

The back of the envelope was closed with a wax seal. I also made a little tag to tie around the glasses. 


I found the wax stamp at Michael's and it says "Top Secret". It was perfect!


Inside the envelope I included two "case files" that have a secret message hidden within the red circle. You have to use the secret agent classes to read the message!


Here you can see one of the hidden messages by looking through the red lens! This was super fun to put together. My younger son now wants to use these supplies to make more spy themed stuff to play with! 


SUPPLIES:

Stamps: Secret Agent (Papertrey Ink)
Paper: Kraft, Very Vanilla (Papertrey Ink)
Ink: Pure Poppy, Smokey Shadow (Papertrey Ink)
Other: Pure Poppy Transparency Sheet (Papertrey Ink), black fun foam, Top Secret Wax Stamp (Michael's), Sangria Sealing Wax (Artisaire)

Friday, August 26, 2022

Back to School Cards

 
My kids went back to school this week so I made each of them a special back to school card for their first day. I used the adorable Pack It Up die from Spellbinders to make custom backpacks! 

The backpacks actually open up to reveal all of the school supplies inside. How cute is that?!

The inside flap is stamped with the grade each of my boys started this year. The paper backpack also matches the color of their real book bags. 

The stamping was done with some older Papertrey Ink school themed sets and the notebook paper in the background is actually pattern paper, also from PTI. 

These were so fun to make and I think the kids enjoyed them. Thanks for looking and have a great day!


SUPPLIES:

Stamps: School Days, Teacher Tickets, Back to School (PTI)

Paper: Pencil Me In Pattern Paper Pad, Soft Stone, Bitty Big: Soft Stone, Enchanted Evening, Bitty Big: Enchanted Evening, Blueberry Sky, True Black, Pure Poppy, New Leaf, Green Parakeet, Stamper's Select White, Luxe Silver (PTI)

Ink: Pure Poppy, Enchanted Evening, Smokey Shadow (PTI), VersaMark

Dies: Pack It Up (Spellbinders)

Monday, May 2, 2022

Just bee-cause

 
Happy Teacher Appreciation Week! If you are an educator, thank you SO much for the many things you do! I made this to give to one of my son's classroom teachers this week. I've had the idea to make some fun themed packaging for this Burt's Bees Honey lip balm for quite a while, but as I was putting it together I just kept pulling things out and ended up using quite a few different products!

A while back I purchased the Lip Balm Pouches from MFT, along with the coordinating Lip Balm Window & Frame die namic. Knowing the size of the lip balm pouch, I created my card around that. I thought it would be fun to use a hexagon shape to tie in with honeycombs, so I used the Hexagon Solid Stack dies from Honey Bee Stamps. It is actually a top folding note card, I just placed the top cutting edge of the larger hexagon die over the score line while die cutting. 

The bee is from Altenew's Mini Delight: Bee Kind set. The sentiment was actually created from three different stamp sets from three different companies! "For you" is from MFT's Itty Bitty Gifting set. "Teacher" is from Sunny Studio's Teacher Appreciation set and "just bee-cause" is from Hero Art's Bee and Flowers Wreath set, selectively inking just the portion I wanted to use. The little hexagons in the background are also from Hero Art, from their Beelieve set. I didn't take a picture of the inside, but I used Papertrey Ink's Zipper Border die so that the recipient can get into the lip balm without tearing the whole card apart. 

This was super fun to put together and I hope my son's teacher likes it!


SUPPLIES:

Stamps: Mini Delight: Bee Kind (Altenew), Beelieve, Bee and Flowers Wreath (Hero Arts), Teacher Appreciation (Sunny Studios), Itty Bitty Gifting (MFT)

Dies: Hexagon Solid Stack (Honey Bee Stamps), Mini Delight: Bee Kind (Altenew), Lip Balm Window & Frame die namic (MFT), Zipper Border die (PTI)

Paper: Lemon Tart, Summer Sunrise (PTI)

Ink: Harvest Gold, Summer Sunrise (PTI), VersaFine Onyx Black

Other: Lip Balm Pouch (MFT) 

Saturday, January 29, 2022

Cozy Cup Coffee Card

 
Hello! This is the first card I've made in the new year and it felt great to be creating again! I have a gift card to a coffee shop to give as a thank you gift so of course I needed to make a coffee themed card to go with it. The Greetery's Cozy Cup set was perfect for this. 

I began by stamping all my pieces onto Stamper's Select White card stock using Pinkfresh Studio inks. For the cup and saucer I used Slumber and Stargazer, the latte art was stamped with Doe and Gathered Twigs, the spoon used Misty Coast and Rocky Slope, and the greenery sprig was done with Olive and Evergreen. For the coaster I blended Slumber onto another piece of white card stock using a very light touch, and then die cut it out with the Cozy Cup Coaster die. 

I also used the Knit Wits stencil using Misty Coast ink to lightly stencil a knit pattern onto the background. I also added a few gold paint splatters. 

For the sentiment, I used the Opposites Attract Hot Foil plates and coordinating dies. I'm still fairly new to hot foiling and had a little under foiling, but as they say, it's handmade not Hallmark! 

Thanks for reading and I hope you have a wonderful weekend!


SUPPLIES:

Stamps: Cozy Cup (The Greetery)

Paper: Stamper's Select White (PTI), Hammermill 100lb

Ink: Slumber, Stargazer, Olive, Evergreen, Doe, Gathered Twigs, Misty Coast, Rocky Slope (Pinkfresh Studio)

Dies: Cozy Cup, Cozy Cup Coaster, Opposites Attract (The Greetery)

Other: Opposites Attract Hot Foil, Knit Wits Stencil (The Greetery), Gold Glimmer Hot Foil (Spellbinders), gold paint


Wednesday, October 6, 2021

Spooky Halloween House


Hello! It has been quite a while since I shared anything here on the blog but today I do have a Halloween card I'm super excited about. I used many of the Open House dies from Spellbinders to create a spooky Halloween house front. To start, the Open House Door Base and Open House Door Side Panel were both die cut from True Black card stock. The windows at the top were die cut with the Open House Halloween dies, to give the look of spiderwebs. 

The solid panels behind each window were cut from white card stock and then I used finger daubers to ink Squeezed Lemonade and Wild Honey Distress Oxide inks to create the look of glowing lit windows. 

The mail slot, door knob, and 31 were all cut from silver card stock. The pumpkin dies are from Open House Boo! I used the same distress oxide ink colors to create the glow inside the jack-o-lanterns. All of the die cut elements were adhered to a Smokey Shadow panel that had some bricks cut from it using the Brick Layer die by The Greetery. I also used a blending brush to add some Black Soot distress oxide ink to the edges of my brick panel to darken and give it dimension. The brick panel was adhered to a Smokey Shadow card base, and I blended a little Hickory Smoke distress oxide ink behind the brick openings for some variation. 

Thanks for looking!

SUPPLIES:

Paper: True Black, Smokey Shadow, Luxe Silver (PTI), Pumpkin Pie (SU!), Accent Opaque White 
Ink: Squeezed Lemonade, Wild Honey, Rusty Hinge, Gathered Twigs, Hickory Smoke, Black Soot (Distress Oxide)

Thursday, June 10, 2021

Seeds Of Knowledge Teacher Cards

 
I've been making a whole stack of end of year teacher cards for all of my son's teachers. It's been fun pulling out lots of different school themed sets! These cards use an old Papertrey Ink set called Seeds of Knowledge. I thought the style of the sentiments would look great with a faux chalkboard theme, and that also ties into a school theme, so I that is the direction I went in. 

The main sentiment of each card was white heat embossed on Smokey Shadow card stock so that it would stand out. Then I added in the flowers, from Itty Bitty Blooms by The Stamp Market, with white pigment ink for a softer look. 

In keeping with the chalkboard look, I added a kraft frame with Ink to Paper's Border Bling: Skinny Diagonal Frames die. 

Finally, the stamped panel was adhered to a white card base. I'm so thankful for everything our teachers do for our kids!


SUPPLIES:

Stamps: Seeds of Knowledge (PTI), Itty Bitty Blooms (The Stamp Market)

Paper: Smokey Shadow, Kraft (PTI), Accent Opaque White

Ink: Sweet Tooth Pigment Ink (MFT), Versa Mark

Dies: Border Bling: Skinny Diagonal Frames (Ink to Paper)

Other: white embossing powder

Tuesday, June 8, 2021

You Make This World a Beautiful Place

The last day of school for my oldest son is tomorrow so I have been a busy bee making end of year thank you cards for all of his teachers. This particular card was a fun one as it is meant for his art teacher! 

I used an old die from My Favorite Things called Artist Palette & Brush die namic. I also dug through my stamps to find images with small splatters. These splatters are from two different sets, Distressed Patterns by MFT and Corner Adorner: April by PTI. 

Each little color of paint was originally die cut from white card stock and then I used Zig Clean Color Real Brush markers to color them in rainbow colors. I also added Glossy Accents to the paint to give it some realistic shine. I also used my Zig markers to color in the tip of the paint brush. 

The sentiment is from the My Monthly Hero Kit May 2019. That kit is super fun because it is all about crafting and art supplies! I can't wait to give this to my son's teacher tomorrow!


SUPPLIES:

Stamps: My Monthly Hero Kit May 2019 (Hero Arts), Corner Adorner: April (PTI), Distressed Patterns (MFT)

Paper: Basic Black (SU!), Kraft (PTI), Accent Opaque White, silver

Ink: Real Red, Only Orange, Summer Sun, Tempting Turquoise (SU!), Mowed Lawn (Distress Ink), Midnight Violet (Altenew), Candy Violet (Pinkfresh Studio), VersaFine Onyx Black

Dies: Artist Palette & Brush die namic (MFT), Crimped Frame (The Greetery)

Other: Zig Clean Color Markers, glossy accents, fun foam

Sunday, May 16, 2021

AlphaBud Bold Floral Details Thank You Cards

After yesterday's card I had (and still have!) quite a few extra stamped AlphaBud Bold Floral Details pieces so I played around with more card designs. I wanted to see how they looked with the Written in Ribbons sentiments. I think they pair beautifully!

On both cards I used the "Thanks" sentiment from Written in Ribbons. You can never have too many thank you cards on hand. I stamped the "thanks" using Coral Reef and Passion Fruit inks, which are the pinks I used on the flowers. I decided to layer my design on a scalloped panel, so I used the Honey Bee Stamps Scallop A2 Card Frames Honey Cuts die. 

Before adhering any die cuts to the scalloped panel, I splattered it with some watered down gold acrylic paint to add some interest and shine to the background. I also stacked two scallop layers together for a bit of dimension. 

I also added a second die cut "Thanks" underneath, so that the sentiment stood out a bit from all of the mini flowers framing it. 

For my second design I used a different scalloped die. I also opted for a smaller format. I cut my card base from white card stock using the Papertrey Ink Noted: Scallop A1 die. 

This time I stamped the sentiment using Grassy Knoll and Olive inks. The "Thanks" die cut is also double stacked for dimension. I also added some piercing detail using Papertrey Ink's Nesting Basics: Pierced Ovals die.

I also added some of the little flowers to the envelope flap to coordinate. I love how these turned out and can't wait to make more!

SUPPLIES:

Stamps: Written in Ribbons, AlphaBuds Bold Floral Details (The Greetery)

Paper: Accent Opaque White

Ink: Coral Reef, Passion Fruit, Berrylicious, Grassy Knoll, Olive, Apricot, Clementine, Persimmon, Lemon Whip, Sweet Mustard (Pinkfresh Studio), Basic Black (SU!)

Dies: Written in Ribbons, AlphaBuds Bold Floral Details (The Greetery), Noted: Scalloped A1 die collection, Nesting Basics: Pierced Ovals die (PTI), Scallop A2 Card Frames (Honey Bee Stamps)

Other: Flappable Stencil (The Greetery)

Saturday, May 15, 2021

Bold Alphabet - Just a Note

Hello! I finally had a chance to play with some of my new anniversary goodies from The Greetery! I tried out the new Bold Alphabet dies and also the AlphaBud Bold Floral Details stamps and dies for this card. 

I cut out the letters from white card stock to form the sentiment "just a note" from the Bold Alphabet dies. I kept the dies wired together and had to run them through my Big Shot several times, even with a metal shim, to get them to cut all the way through. I also cut the AlphaBud Bold Floral Details die from white card stock. I die cut several sets, knowing I wanted to stamp a big pile of blooms. 

Then I got to stamping all of those adorable mini flowers! I kept to a summery color palette of pinks, yellows and oranges using Pinkfresh Studio inks (colors listed below). Then I had fun arranging! Before adhering my final arrangement onto a panel cut with the Nordic Frame die, I splattered it with gold ink for a little added interest to the background. The focal panel is popped up with fun foam underneath. I also sponged some Coral Reef ink around the edges of my white notecard base to give some definition to the Nordic Frame detailing. Thank you so much for reading!

SUPPLIES:

Stamps: AlphaBud Bold Floral Details (The Greetery)

Paper: Accent Opaque White

Ink: Coral Reef, Passion Fruit, Berrylicious, Olive, Apricot, Clementine, Persimmon, Lemon Whip, Sweet Mustard (Pinkfresh Studio), Basic Black (SU!)

Dies: Bold Alphabet, AlphaBud Bold Floral Details, Nordic Frames (The Greetery)

Other: Flappable Stencil (The Greetery), gold paint

Thursday, May 6, 2021

Teacher Appreciate Gifts 2021

Hello! It is Teacher Appreciate Week and boy do we appreciate our teachers! After months of virtual learning I am SO glad my kids are back at school in person! I put together these small gifts for my kids' teachers as a small way of saying thank you for all they do. 

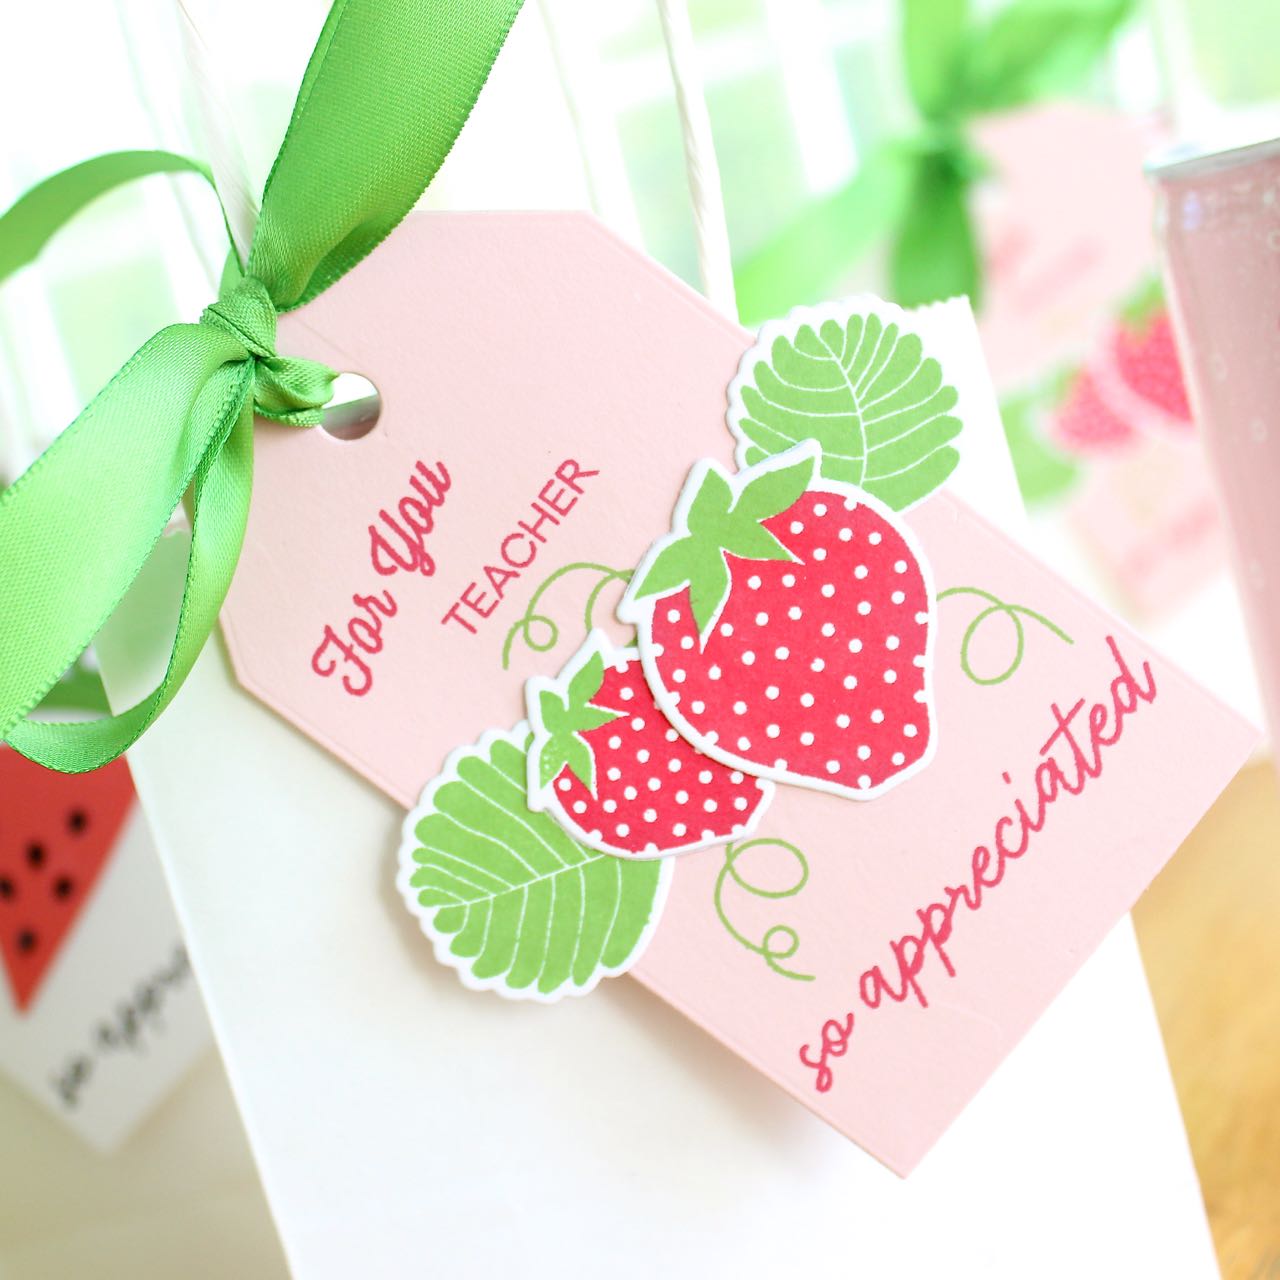
I spied these adorable mini sparkling juice cans at Trader Joe's this week and the wheels immediately started spinning on how I could dress them up for gift giving. They came in a few different flavors; I bought the strawberry and watermelon ones. I had some small white gift bags already that fit the cans perfectly. They just needed tags!

For the strawberry cans I pulled out a retired Papertrey Ink stamp set called Strawberry Patch. I used the cans themselves as very literal inspiration for the tags. I began by die cutting an Essential Tag from Sweet Blush card stock. Then I cut several of the strawberries and leaves out of white card stock and stamped them in Real Red and New Leaf inks. The "For You Teacher" sentiment is from another retired Papertrey Ink set called Enclosed: Apple. I was delighted to find this "so appreciated" sentiment from one of my The Stamp Market sets called Summer Stems! I also stamped a few curly vine images, also from Strawberry Patch, directly on the tag peeking out from the strawberries and leaves. I tied the tag using some matching green satin ribbon.

For the watermelon tags I also cut an Essential Tag, this time from white card stock. I used the Fruit Salad: Watermelon die set from Papertrey Ink for this tag. SO fun! I used Berry Sorbet, New Leaf and white card stock. I die cut the watermelon a second time from True Black card stock and inlaid the seeds. After the tag was assembled I also went back over the seeds with glossy accents for some realistic shine. The sentiments were stamped in New Leaf, Berry Sorbet and Onyx Black inks. I used matching Berry Sorbet Saddle Stitch Ribbon to tie them on. 

I am so happy with how these turned out and they were delivered to the teachers today. I hope they enjoy them and thank you to all of the teachers out there!


SUPPLIES:

Stamps: Enclosed: Apple, Strawberry Patch (PTI), Summer Stems (The Stamp Market)


Ink: Berry Sorbet, New Leaf (PTI), Real Red (SU!), VersaFine Onyx Black


Other: Berry Sorbet Saddle Stitch Ribbon (PTI), Limeade Splash Satin Ribbon (Fun Stamper's Journey), glossy accents

Tuesday, May 4, 2021

Purple Layered Bouquet Mother's Day Cards

Today I am sharing more Layered Bouquet Mother's Day cards. I seriously stamped a big pile of pink and purple bouquets and went to town making cards! These are very similar to yesterday's pink cards. 

For today's purple cards I used Altenew inks. The blooms are stamped in Soft Lilac and Lavender Fields. The leaves are stamped in Leafy and Mossy inks from The Stamp Market. The background was die cut from Lilac Grace card stock with the Pierced Plaid Cover die, also from The Stamp Market. The sentiment is a retired Papertrey Ink set called Keep it Simple: Mother, stamped onto a Tag Sale Quilted die. To add some dimension I used Jennifer McGuire's trick of layering die cuts. I had a couple of bouquets that didn't stamp well, so I glued them underneath! Both the bouquet and sentiment strip have three layers glued together. 

This card is stamped in the same inks. The background was die cut with Pinkfresh Studio's Essentials: Diagonal Stitched Plaid die, trimmed down to leave a white border. The bouquet is layered onto an Intricate Mandala die cut. 

Here are the last two purple cards. 

This time I layered the bouquet onto a Delicate Doilies die cut from vellum. 

These last flowers were stamped in slighter darker purple shades. I used Lavender Fields and Deep Iris. I stenciled directly onto a top folding notecard with the Diagonal Plaid stencil to create the background. This sentiment is also from Keep it Simple: Mother. This simple design was one of my favorites! I also used the Flappable Stencil from The Greetery to embellish each of the envelope flaps. 

As I said before, I stamped a big pile of the Layered Bouquets, but I don't really like to mass produce the same thing over and over again, so I enjoyed making each one slightly different!

SUPPLIES:

Stamps: Layered Bouquet (Pinkfresh Studio), Keep it Simple: Mother (PTI)

Paper: Lilac Grace (PTI), Accent

Ink: Soft Lilac, Lavender Fields, Deep Iris (Altenew), Leafy, Mossy (The Stamp Market), VersaFine Onyx Black


Other: Diamond Plaid Stencil (Pinkfresh Studio), Flappable Stencil (The Greetery)

Monday, May 3, 2021

Pink Layered Bouquet Mother's Day Cards

 
I am making Mother's Day cards for all of the moms and mentor moms in my church moms's group. We have been entirely virtual for over a year now so I wanted to send them each something personal to stay connected and hopefully brighten their day. I used lots of Pinkfresh Studio supplies on these, including more of the Layered Bouquet set I used in yesterday's card. 

I stamped the blooms in Pale Peony and Hibiscus Burst inks. The leaves are stamped in Leafy and Mossy. For this card I layered the bouquet on an Essentials: Braided Circles die cut. The pink layer was die cut from Pale Peony card stock with the Essentials: Diagonal Stitched Plaid cover die. I trimmed it down to leave a white border. The sentiment is from a retired Papertrey Ink set called Keep it Simple: Mother, stamped onto a Tag Sale Quilted die cut. 

This card is much simpler, with the bouquet adhered directly onto the card front. To create the background I blended Pale Peony ink directly onto the card base with just the first layer of the Diamond Plaid stencil. The sentiment is again from Keep it Simple: Mother. 

This card is much like the first, except the Essentials: Diagonal Stitched Plaid die was cut from white card stock, and the flowers were layered onto an Intricate Mandala die cut from vellum. The plaid die cut is also popped up with foam adhesive underneath. Also, I used the Flappable Stencil from The Greetery to decorate each of the envelope flaps. These were so fun to make! I loved cutting a big pile of blooms and then changing each card slightly to make them each unique. I'll have more cards to share later this week!


SUPPLIES:

Stamps: Layered Bouquet (Pinkfresh Studio), Keep it Simple: Mother (PTI)

Paper: Pale Peony, Vellum (PTI), Accent

Ink: Pale Peony, Hibiscus Burst (PTI), Leafy, Mossy (The Stamp Market), VersaFine Onyx Black


Other: Diamond Plaid Stencil (Pinkfresh Studio), Flappable Stencil (The Greetery)