Wednesday, December 30, 2020

Homespun Holiday: Keepsake Ornaments

I'm very excited about today's post. Lizzie Jones, formerly a designer for Papertrey Ink, started her own company called Poshta Design and released a collection of stitching ornament dies. These were an investment, but I am glad I got them because they are SO fun! The collection is called Homespun Holiday: Keepsake Ornaments Kit. It includes dies to create four different ornament shapes, many different embellishment dies, felt, sequins, beads, needles, an inspiration guide, everything you need to start creating right out of the box!

I think my favorite way to embellish the ornaments was with this snowflake design. Isn't it gorgeous?! I used white thread and sparkly clear sequins and beads; it glistens beautifully in real life. 

When you purchase the kit, you pick a "color story" to go with it. This is a collection of felt in a certain color family with coordinating thread, sequins and beads. But for this ornament I actually used some MFT felt I already had because I wanted to make a pink ornament and the color story I chose didn't include pink felt. Any quality wool felt I think would work fine. Both the felt that came in the kit and the MFT felt cut beautifully. 

This ornament uses the "Frost" color story, which is a collection of blues and creams. You can add the beads and sequins anywhere you like. Once all my felt was stitched, it was so fun to play around with the sequins and beads to figure out which colors and placement looked best. 

You can see how different each of these three round ornaments look, just by changing which embellishment dies I used! This one uses the tiny snowflake three times across the band. In addition to the color story that comes with your kit, you can purchase felt rolls individually, which is what I did here so that I would also have some green felt to work with. It was easy to find DMC thread to match. 

My favorite ornaments tended to be the ones like this, that had a very simple color palette. I thought a single sequin and bead at the center was all this tear drop ornament needed. 

This is the last one I made. I was going for a more traditional color palette and used the thread as an accent color rather than matching it to the felt. All of my ornaments I sewed flat, instead of stuffing with fiber fill. But you can do either, and both my boys have requested I make them "puffy" ornaments next. 

I made these ornaments as gifts for close family and special teachers. I hope they bring happy memories as they put them on their Christmas tree each year!

Tuesday, December 29, 2020

Peppermint Soap Gift Bags

These are the Christmas gifts I put together for my oldest son's teachers this year. Each glassine bag holds a bar of homemade peppermint soap and then I embellished the bags with some festive stamped and die cut tags.

The candy cane is from The Stamp Market's No Peeking set. I love that the tag gives a little clue about what is inside!

I used a variety of sentiments from the Candy Cane Christmas set, stamped onto a banner die cut.

The holly leaves are an MFT die called Holly Berries, with sequins for the berries. 

I used gold and white baker's twine to hold everything together, including the card tied onto the back of each bag. I hope the teacher's enjoyed their gift and know how appreciated they are!
 

SUPPLIES:

Stamps: No Peeking, Candy Cane Christmas (The Stamp Market)

Paper: Stamper's Select White, Green Parakeet (PTI)

Ink: Real Red (SU!), Versa Fine Onxy Black

Dies: No Peeking (The Stamp Market), Holly Berries die namic, Starburst Sentiment Strip (MFT)

Other: Sequins, white & gold baker's twine, crop-a-dile, glassine bags

Tuesday, December 22, 2020

Peace on Earth

I have a few more Christmas projects to share this week. I loved how the sky background turned out so much on my last card that I decided I wanted to use it again! This time I used just two blues instead of three to create a cool wintery background. I started by blending Blueprint Sketch distress oxide at the top of a white card panel, then blended in some Broken China, and faded to almost white at the very bottom. 

After my ink blending was done I stamped the Paint Splatter Background in Sweet Tooth ink to create some soft snow flurries. Then I die cut the entire ink blended panel with the largest Nordic Frames die. I also added three sparkly snowflakes cut from some very old SU! silver glimmer paper using Honey Bee Stamp's Layering Snowflakes die. These are so pretty in real life!

For the sentiment, I used The Greetery's lovely set Written in Ribbons Holiday. The word "Peace" is stamped in Blueprint Sketch distress oxide ink as well as Bashful Blue ink by SU!. I die cut the word a second time from white fun foam and adhered the two together with liquid glue. The final stamping was adding "on earth" in Blueprint Sketch ink. Lastly, the focal panel was adhered to a white card base. 

Anyone else still making last minute holiday projects? 


SUPPLIES: 

Stamps: Written in Ribbons Holiday (The Greetery), Paint Splatter Background (MFT)

Paper: Stamper's Select White (PTI), Silver Glimmer (SU!)

Ink: Blueprint Sketch, Broken China (Distress Oxide), Bashful Blue (SU!), Sweet Tooth (MFT)

Dies: Written in Ribbons Holiday, Nordic Frames (The Greetery), Layering Snowflakes (Honey Bee Stamps)

Tuesday, December 1, 2020

Stay Cozy

Today we got our first big snow of the season (in fact it is still snowing!), so it seemed fitting to share this card. I recently bought the new Mini Delights: Polar Bear bundle by Altenew because both my boys love polar bears, and it was fun to get to play with it!

I started by cutting a panel of white card stock to 5 1/2" x 4 1/4" and then got to work ink blending my arctic blue sky. I started with Chipped Sapphire at the top, then Blueprint Sketch in the middle, and ended with Broken China at the bottom. I went back and added a touch of Black Soot at the very top to darken it a bit more. 

To create the snow flurries I used the Paint Splatter Background by MFT, stamped in Sweet Tooth ink. I also embossed one of the sentiments from the Mini Delights: Polar Bear set in the upper right corner with white embossing powder. 

I die cut the polar bear from white card stock and added his face in Black Soot ink. Then I made the snowy hills by cutting white card stock with the In the Meadow dies by PTI. I used a very light touch to blend more Broken China along the tops of the hills to give them definition. 

I adhered the snowy hills to my sky panel and trimmed the part that hung over the sides. Then I glued on my polar bear and added that entire panel to a white note card. 

I hope you are staying warm and cozy wherever you are. Happy first day of December!


SUPPLIES:


Paper: Stamper's Select White (PTI)

Ink: Chipped Sapphire, Blueprint Sketch, Broken China, Black Soot (Distress Oxide), Sweet Tooth (MFT), VersaMark


Other: white embossing powder

Saturday, November 28, 2020

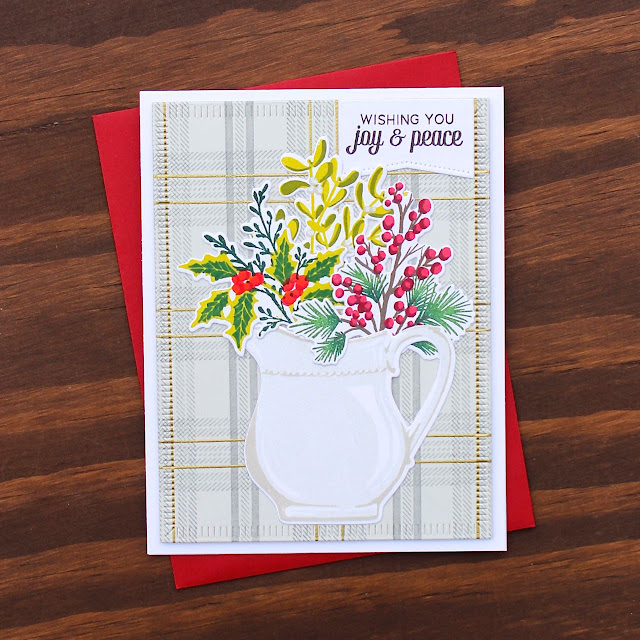
Wishing You Joy & Peace

I was recently given Budding Beauties Winter for my birthday and I couldn't wait to see what those festive sprigs would look like paired with Pitcher-esque! I love the result! That cute little pitcher is finding its way into most of my cards lately, but I can't help it, I love it so much! 

As I have done previously, I actually only stamped two of the three layers that make up the pitcher. I used Soft Stone and Pumice stone for an ironstone look. 

The sentiment is from Sentiment Suite: Christmas and is stamped on a little banner die cut from Sentiment Suite Basics. It fit perfectly tucked up in the corner. 

I had a lot of fun playing around with the various greenery sprigs. The pine needles I stamped in Garden Green ink and then used a finger dauber to add Pine Feather ink near the base to give it more dimension. The stem is stamped in Ground Espresso and the berries are stamped in a combination of Real Red and Scarlet Jewel inks. 

The holly branch is stamped with Citrine and Pine Feather inks, while the berries were stamped in Candied Apple and Real Red. The mistletoe behind it was stamped in Citrine and Mossy inks, and the berries were stamped in Soft Stone and Pumice Stone inks. 

Let's talk about the background. I used a new to me set from Concord & 9th called Happy Plaids and it is amazing! So many possibilities! I started with a panel of 5 1/2" x 4 1/4" inch Soft Stone and used Weathervane ink to stamp a plaid pattern using two of the stripe stamps in the set. I also used the double solid line stamp to emboss some gold into my pattern. When that was all done I die cut it using the largest of the Crimped Frame dies. Funny story about the background: This gray and gold plaid pattern was 100% inspired by my pajama pants! Ha! 

Thanks for reading, I hope you are enjoying a relaxing weekend with your loved ones and find some time to craft! 
 

SUPPLIES:

Stamps: Budding Beauties Winter, Pitcher-esque, Sentiment Suite: Christmas (The Greetery), Happy Plaids (Concord & 9th)

Paper: Stamper's Select White, Soft Stone (PTI)

Ink: Soft Stone, Weathervane, Pinefeather, Scarlet Jewel (PTI), Citrine, Mossy (The Stamp Market), Pumice Stone, Candied Apple, Ground Espresso (Distress Oxide), Real Red, Garden Green (SU!), VersaMark

Dies: Budding Beauties Winter, Pitcher-esque, Sentiment Suite Basics, Crimped Frame (The Greetery)

Tuesday, November 24, 2020

Lucky Break Thanksgiving Card

I have one last Thanksgiving card to share before the big day on Thursday. I've had the the idea for this card rumbling around in my head for a while and so was happy to finally make it. I started by die cutting a panel of Chocolate Chip card stock with the largest of the Nordic Frames dies. 

The wishbone image is from a Papertrey Ink set called Lucky Break. I embossed it in gold on the Chocolate Chip panel. 

The sentiment is from another Papertrey Ink set called Autumn Pumpkins, also embossed in gold. The entire focal panel is popped up with foam tape and adhered to a Rustic Cream card base. 

Wishing everyone a safe and Happy Thanksgiving!


SUPPLIES:


Paper: Rustic Cream (PTI), Chocolate Chip (SU!)

Ink: VersaMark

Dies: Nordic Frames (The Greetery)

Other: gold embossing powder

Sunday, November 22, 2020

Maple Leaf Thank You

I wanted to share this simple fall thank you card. It's always good to have thank you notes on hand and this one is quick and easy! The maple leaf is from a retired Papertrey Ink set called Leaf Prints and is stamped in Real Red ink. The veining detail was embossed in gold and is very pretty in real life. The sentiment, from Autumn Pumpkins, is stamped in Chocolate Chip ink. That's it! I made quite a few of these assembly line style so I would have some thank you's ready when needed. Thanks for reading!


SUPPLIES:

Stamps: Leaf Prints (retired), Autumn Pumpkins (PTI)

Paper: Rustic Cream (PTI)

Ink: Real Red, Chocolate Chip (SU!), VersaMark

Other: gold embossing powder

Thursday, November 12, 2020

Fall Pitcher Card

I've been having so much fun playing around with my different fall themed stamps and dies. This card is very similar to the one I shared here, but by changing the background and colors slightly it looks completely different! 

The background was made with The Greetery's Square Dance die and stencil. I blended Black Soot distress oxide and Weathervane inks to create the gingham look. The fall stems are held in the pitcher from Pitcher-esque. The pitcher is a three step stamp, but I only used the second and third layer so that the highlights remained white. I used a combination of Soft Stone and Pumice Stone inks, which I thought created a nice ironstone look. 

I'm planning on sending this out as a Thanksgiving card, so I also added a cute little pumpkin, from PTI's set Simply Gourd-eous. It is inked in Melon and Pumpkin Pie inks, and the stem is inked in Mellow Moss and Always Artichoke. 

The berries, from The Greetery's set Budding Beauties Autumn, are stamped in a combination of Fired Brick and Americana inks, the leaves are done in Mossy, and the stem is stamped in Soft Suede. 

The fiery maple leaves, from Autumn Sketches, are stamped in Summer Sunrise and Orange Zest inks. 

The Wheat, also from Budding Beauties Autumn, is stamped in Scattered Straw and Creamy Caramel inks. 

Thanks for reading and I hope you are having a wonderful week!


SUPPLIES:


Paper: Rustic White (PTI)

Ink: Black Soot, Pumice Stone, Scattered Straw, Fired Brick (Distress Oxide), Weathervane, Soft Stone, Americana, Summer Sun, Orange Zest (PTI), Melon, Mossy (The Stamp Market), Pumpkin Pie, Mellow Moss, Always Artichoke, Creamy Caramel, Soft Suede (SU!)


Other: Square Dance Stencils (The Greetery)

Thursday, November 5, 2020

Happy Thanksgiving Pumpkin Card

Now that Halloween is over I am ready to start focusing on Thanksgiving. 2020 has been a hard year, but we still have lots to be thankful for! 

I used a mix of old and new favorites to make this fall card. I just love how the pumpkins look against that gingham background! The pumpkins and gourds are from a Papertrey Ink set called Simply Gourd-eous. The background was done by cutting a rustic white piece of card stock with the Square Dance die, and using the matching stencils to blend Black Soot and Smoky Slate inks to create a black gingham pattern. 

The large pumpkin on the end was stamped in Melon, Pumpkin Pie and Really rust inks, with the stem stamped in Mellow Moss and Artichoke. The smaller pumpkin next to it was stamped in Orange Zest and Tangerine Tango, with the stem stamped in Brushed Corduroy and Close to Cocoa. The wheat that is tucked under the pumpkins is from Budding Beauties Autumn and was stamped in So Saffron and Classic Kraft inks. 

The pumpkin on the left is identical to the pumpkin on the far right. The green pumpkin I stamped in colors to resemble a Hubbard squash, using Bundled Sage and Always Artichoke inks, with the stem stamped in Antique Linen and Classic Kraft. Finally, the gourd in the center was stamped with Leafy, Pinefeather and Harvest Gold inks, and the stem was stamped in Soft Suede and Ground Espresso.

After stamping all of those pumpkins I had just about every fall colored ink pad I owned spread across my desk! Ha! Lastly, the sentiment strip is actually Rustic White card stock that I ink blended Black Soot over to match the background, and then embossed the sentiment in white. 

Thanks for hanging in there through all of those color descriptions, this was super fun to make and I can't wait to send it out when Thanksgiving gets closer!


SUPPLIES

Stamps: Simply Gourd-eous, Keep it Simple: Thanksgiving (PTI), Budding Beauties Autumn (The Greetery)

Paper: Rustic White (PTI)

Ink: Black Soot, Bundled Sage, Antique Linen, Brushed Corduroy, Ground Espresso (Distress Oxide), Smokey Slate, Classic Kraft, Pinefeather, Harvest Gold, Orange Zest (PTI), Melon, Leafy (The Stamp Market), Pumpkin Pie, Tangerine Tango, Really Rust, Mellow Moss, Always Artichoke, Soft Suede, Close to Cocoa, So Saffron (SU!)

Dies: Simply Gourd-eous (PTI), Budding Beauties Autumn, Square Dance (The Greetery)

Thursday, October 29, 2020

Boo Box Bats


Hello! I'm just popping in with a quick Halloween project I made for my kids. I recently purchased the Boo Box die namic from My Favorite Things when it was on sale, and I have to say this thing is so fun! It was super simple to quickly die cut and assemble these little treat boxes. I used traditional colors for the bat, and just added google eyes. I cut the base from True Black card stock, and it is very sturdy and actually holds quite a bit of candy. I'll have these at the boys' places at the table when they wake up on Halloween morning as a fun surprise. 

Happy Halloween!


SUPPLIES

Dies: Boo Box die namics (MFT)
Card Stock: True Black, Stamper's Select White, (PTI), red, pink (generic)

Other: google eyes

Wednesday, October 21, 2020

Garden Lattice Card

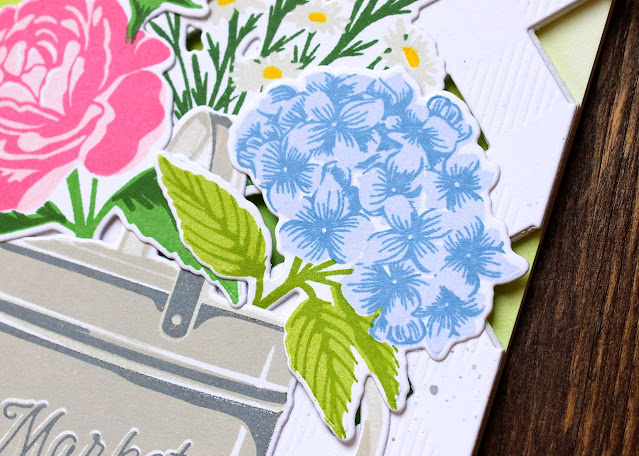
When I first saw The Greetery's Square Dance die I thought it looked a lot like a garden lattice and couldn't wait to try making a card around that theme. I finally had a chance to play with it and make that happen! 

I cut the Square Dance die from white card stock and also white fun foam to go behind it and give it some thickness and dimension, like a real lattice would. I splattered the card stock lattice with some weathervane ink and then used liquid glue to adhere the two layers together. This was adhered to a white card stock base that I had blended Mowed Lawn and Twisted Citron Distress Oxide inks onto, trying to create the lovely green glow of a garden in the background. 

Going with a garden theme, I used the watering can from Sprinkled with Kindness and filled it up with blooms! The watering can itself is stamped in Soft Stone, Pumice Stone and Weathervane inks. 

I used all three flowers from the Budding Beauties Summer set. The hydrangea blooms are stamped in Almost Amethyst and Blueberry Sky inks, and the greenery is done in Leafy and Parakeet inks. 

The peonies were stamped in Pink Pirouette and Hibiscus Burst, with the leaves stamped in Cactus and Garden Green. 

Lastly, the daisies were stamped with Soft Stone, Bright Buttercup and Garden Green for the stems. 

I had my husband's aunt in mind when I made this card. She recently gifted us some lily bulbs from her garden, that were originally from her dad's (my husband's grandfather's) garden. I'm sending her this card as a thank you for such a special gift. 

Thank you for stopping by!


SUPPLIES:


Paper: Stamper's Select White (PTI)

Ink: Pink Pirouette, Garden Green, Almost Amethyst (SU!), Hibiscus Burst, Blueberry Sky, Green Parakeet, Soft Stone, Bright Buttercup, Weathervane (PTI), Cactus, Leafy (The Stamp Market), Pumice Stone, Mowed Lawn, Twisted Citron (Distress Oxide)


Other: white fun foam

Tuesday, October 20, 2020

Joy Wreath Card

I'm in the Christmas mood today! I've been seeing so many beautiful wreath cards lately that I was inspired to try making one with my own supplies. 

The greenery in the wreath was die cut from Handsome Hunter card stock using The Greetery's Botanicuts Pine Bough die. I cut it multiple times and ended using mostly the small branches with a few of the larger ones that had been trimmed a bit shorter. That allowed me to layer them in a nicely shaped circle. 

The gorgeous bow at the top is die cut with the Fit to Be Tied die using Pure Poppy card stock. Both the pine bough branches and the bow were splattered with white paint to give them a snowy look. 

This "Joy" sentiment is from Papertrey Ink's set called Sending Joy. I used the matching die and embossed it in gold. 

Finally, the wreath and sentiment were adhered using liquid glue to a background panel covered in shiplap. This was done using the amazing Shiplap Builder dies. I seriously love this die so much and you will definitely be seeing it again! Once all of my shiplap pieces were adhered to the card base, I splattered them with Ground Espresso distress oxide ink. 

I really like how this turned out and look forward to sending it out once Christmas gets closer! 


SUPPLIES:

Stamps: Sending Joy (PTI)

Paper: Rustic White, Pure Poppy (PTI), Handsome Hunter (SU!)

Ink: Ground Espresso (Distress Oxide), Versa Mark

Tuesday, October 13, 2020

You've Been Boo'ed!


It's that time of year again, when little ghosts go around our neighborhood under the cover of darkness and leave anonymous treats for all the children. Does your neighborhood participate in the You've Been Boo'ed tradition? Ours does, and last night our house was Boo'ed! I'd seen the ghosts popping up on neighbors' doors, so I was ready with goodie bags when the time came. Of course I wanted to dress them up with some homemade tags, though, because that's what stampers do! :) 

I used the Booed stamp set (retired) from Neat & Tangled, which of course is just perfect. It was embossed in white and layered nicely on a Tag'd die from The Stamp Market. The spider web, embossed in silver, is from Papertrey Ink's Corner Adorner: August stamp set.  Some black and white baker's twine finished it off. I think it turned out super cute and loved how it looked on the treat bags. 

Thanks for reading!


SUPPLIES:

Stamps: Booed (Neat & Tangled), Corner Adorner: August (PTI)

Paper: True Black (PTI), Pumpkin Pie (SU!)

Ink: Versa Mark

Dies: Tag'd (The Stamp Market)

Other: white embossing powder, silver embossing powder, baker's twine


Monday, October 12, 2020

Praying for You

I made this encouragement card for someone going through a difficult time health wise. Ever since I bought The Greetery's Pitcher-esque stamp set I have been itching to fill it up with some lovely fall branches, and this was the perfect opportunity. 

I started by die cutting and stamping the pitcher. It is a three step stamp, but I omitted the first step so the highlights would remain white. Steps two and three were stamped in Antique Linen and Frayed Burlap distress oxide ink respectively. The sentiment, from Papertrey Ink's set Keep it Simple: Praying for You, was stamped onto a strip of vellum using Onyx Black ink. The vellum is wrapped around the card front and adhered on the back. 

I used both Autumn Sketches and Budding Beauties: Autumn to fill up the pitcher. The maple leaves were stamped with Summer Sunrise and Pure Poppy inks. The wheat was stamped in Scattered Straw and Creamy Caramel, and the berries were done in Pure Poppy, Scarlett Jewel and Citrine inks. 

The background was done using the Shiplap Builder dies. These are amazing! I am sure to get a lot of use out of those. I hope this card brings some encouragement to the recipient.

Thanks for reading and have a wonderful week!


SUPPLIES:


Paper: Rustic White, Vellum (PTI)

Ink: Antique Linen, Frayed Burlap, Scattered Straw (Distress Oxide), Summer Sunrise, Pure Poppy, Scarlett Jewel (PTI), Soft Suede, Creamy Caramel (SU!), Citrine (The Stamp Market), Versa Fine Onyx Black