Showing posts with label my favorite things. Show all posts

Tuesday, June 8, 2021

You Make This World a Beautiful Place

The last day of school for my oldest son is tomorrow so I have been a busy bee making end of year thank you cards for all of his teachers. This particular card was a fun one as it is meant for his art teacher! 

I used an old die from My Favorite Things called Artist Palette & Brush die namic. I also dug through my stamps to find images with small splatters. These splatters are from two different sets, Distressed Patterns by MFT and Corner Adorner: April by PTI. 

Each little color of paint was originally die cut from white card stock and then I used Zig Clean Color Real Brush markers to color them in rainbow colors. I also added Glossy Accents to the paint to give it some realistic shine. I also used my Zig markers to color in the tip of the paint brush. 

The sentiment is from the My Monthly Hero Kit May 2019. That kit is super fun because it is all about crafting and art supplies! I can't wait to give this to my son's teacher tomorrow!


SUPPLIES:

Stamps: My Monthly Hero Kit May 2019 (Hero Arts), Corner Adorner: April (PTI), Distressed Patterns (MFT)

Paper: Basic Black (SU!), Kraft (PTI), Accent Opaque White, silver

Ink: Real Red, Only Orange, Summer Sun, Tempting Turquoise (SU!), Mowed Lawn (Distress Ink), Midnight Violet (Altenew), Candy Violet (Pinkfresh Studio), VersaFine Onyx Black

Dies: Artist Palette & Brush die namic (MFT), Crimped Frame (The Greetery)

Other: Zig Clean Color Markers, glossy accents, fun foam

Saturday, April 24, 2021

Up, up and away!

My youngest son turned 5 a few weeks ago (a whole hand!) and we celebrated with an airplane themed birthday party. I made this airplane shaker card for him using a retired Papertrey Ink set called Little Hot Rod. 

I started by stenciling a white card stock panel with the Cloud Stencil from My Favorite Things using a blending brush and Tumbled Glass distress oxide ink. I also die cut and stamped the little airplane in Real Red ink because my son's favorite color is red. 

The sentiment is stamped using VersaFine Onyx Black ink. I used my Stamparatus to get it positioned exactly where I wanted it on the cloud panel. 

To create the shaker clouds I used a retired die-namic from My Favorite Things called Cute Cloud Outlines. It has three sizes of clouds, and I used them all. I cut one of each size out of the cloud panel, and then I cut them again from double sided adhesive foam sheets, which were adhered underneath to create the shaker walls. 

I filled each cloud with a mix of blue and clear beads from JoAnn. The blue beads are a very good match for the Tumbled Glass ink! This was a fun one to make and my son was so excited to receive a shaker card of his very own! 


SUPPLIES:

Stamps: Little Hot Rod (PTI)

Paper: Stamper's Select White (PTI)

Ink: Tumbled Glass (Distress Oxide), Real Red (SU!), VersaFine Onyx Black

Dies: Little Hot Rod (PTI), Cute Cloud Outline die namic (MFT)

Other: Cloud Stencil (MFT), double sided foam adhesive, beads, clear acetate, Stamparatus (SU!)

Sunday, February 28, 2021

Choo Choo You're 2!

My little nephew turned 2 this past week so of course I had to make him a fun card. I knew I wanted to use the MFT Pumped-Up Numbers die-namic and thought it would be fun to have it pulled by the train from PTI's Little Hot Rod (retired). From there I just kept pulling out supplies to make my scene!

I die cut the number 2 from Pacific Point card stock and applied a very liberal coating of Glossy Accents to give it that shiny balloon look. I die cut it a second time from white fun foam and adhered the two together to give it some dimension. It's hard to tell from my photos, but I used a Cloud Stencil and Tumbled Glass distress oxide ink to create a sky full of puffy white clouds. I also did some selective inking from the sentiments in Little Hot Rod to create my custom sentiment. 

The grassy hillside was created by ink blending Mowed Lawn and Rustic Wilderness distress oxide inks onto a panel of white card stock cut with the long ground die from the Under the Sea die-namics. I also used the Grassy Edges stencil to go back in and add the tufts of grass in the same inks. The train itself is stamped in three shades of blue ink and die cut. I glued a super thin piece of card stock behind the train and cars to hold them together because I wanted to include a slider element so the train could actually move! The slider channel was cut from MFT's Surf & Turf die-namic, which I believe is now retired. The "track" is made from a thin piece of Chocolate Chip card stock die cut with the Build-a-Scene: On the Road die from Taylored Expressions. Lastly, I used some blue and white baker's twine to attach the balloon to the train. This was super fun to make!
 

SUPPLIES:

Stamps: Little Hot Rod (PTI)

Paper: Pacific Point, Chocolate Chip (SU!), Stamper's Select White (PTI)

Ink: Pacific Point, Bliss Blue (SU!), Blueberry Sky (PTI), Mowed Lawn, Rustic Wilderness, Tumbled Glass (Distress Oxide), Versa Fine Onyx Black

Dies: Little Hot Rod (PTI), Pumped-Up Numbers die-namic, Under the Sea die-namic, Surf & Turf die-namic (MFT), Build a Scene: On the Road (Taylored Expressions), Card Front Element Builder (Sugar Pea Designs)

Stencils: Cloud, Grassy Edges (MFT)

Other: Slider Elements (MFT), glossy accents, blue & white baker's twine, foam tape, fun foam

Tuesday, February 16, 2021

It's Cake Chomping Time

When My Favorite Things released their Baby Shark die-namic and Sharky Sentiments set, I bided my time until they went on sale and then bought them. Both my boys love sharks, especially my oldest, so I knew they would eventually get put to good use. Well, my oldest just celebrated his 8th birthday so I finally got a chance to play and make him a fun shark card!
 
The body of the shark is die cut from Smoky Slate card stock and the mouth is cut from Soft Stone card stock. Both of those pieces were also lightly sponged around the edges with their coordinating ink to give the shark a little dimension. The body of the shark has embossing lines built in so it is extremely easy to line up the eyes and mouth. 

To create the underwater background I used four different shades of blue distress oxide ink and the Ray of Light stencil. Before laying down the stencil, I lightly ink blended Tumbled Glass and Salty Ocean ink from top to bottom on my white card base. Then I put the stencil over top and blended more Tumbled Glass and Salty Ocean, along with Blueprint Sketch and Chipped Sapphire toward the bottom. After removing the stencil I went back and laid down a little more color so the lines weren't quite so stark. Once I was happy with the colors I splattered it with water to create "bubbles". There were several moments during this process I was sure I had ruined the whole thing but I am happy with how it turned out. 

The Sharky Sentiments are all really funny but this is the one I chose. It is embossed in white on a black strip die cut with one of the Skinny Mini Banners from PTI. What I loved about this particular banner was the jagged edges, like the shark had "chomped" off the edges! The shark and the sentiment are both popped up with foam tape and that is that. I love how this turned out and so did my son!


SUPPLIES:

Stamps: Sharky Sentiments (MFT)

Paper: Stamper's Select White, Soft Stone, True Black (PTI), Smoky Slate (SU!)

Ink: Tumbled Glass, Salty Ocean, Blueprint Sketch, Chipped Sapphire, Aged Mahogany (Distress Oxide), Smoky Slate (SU!)


Other: Ray of Light Stencil (MFT), white embossing powder

Friday, February 5, 2021

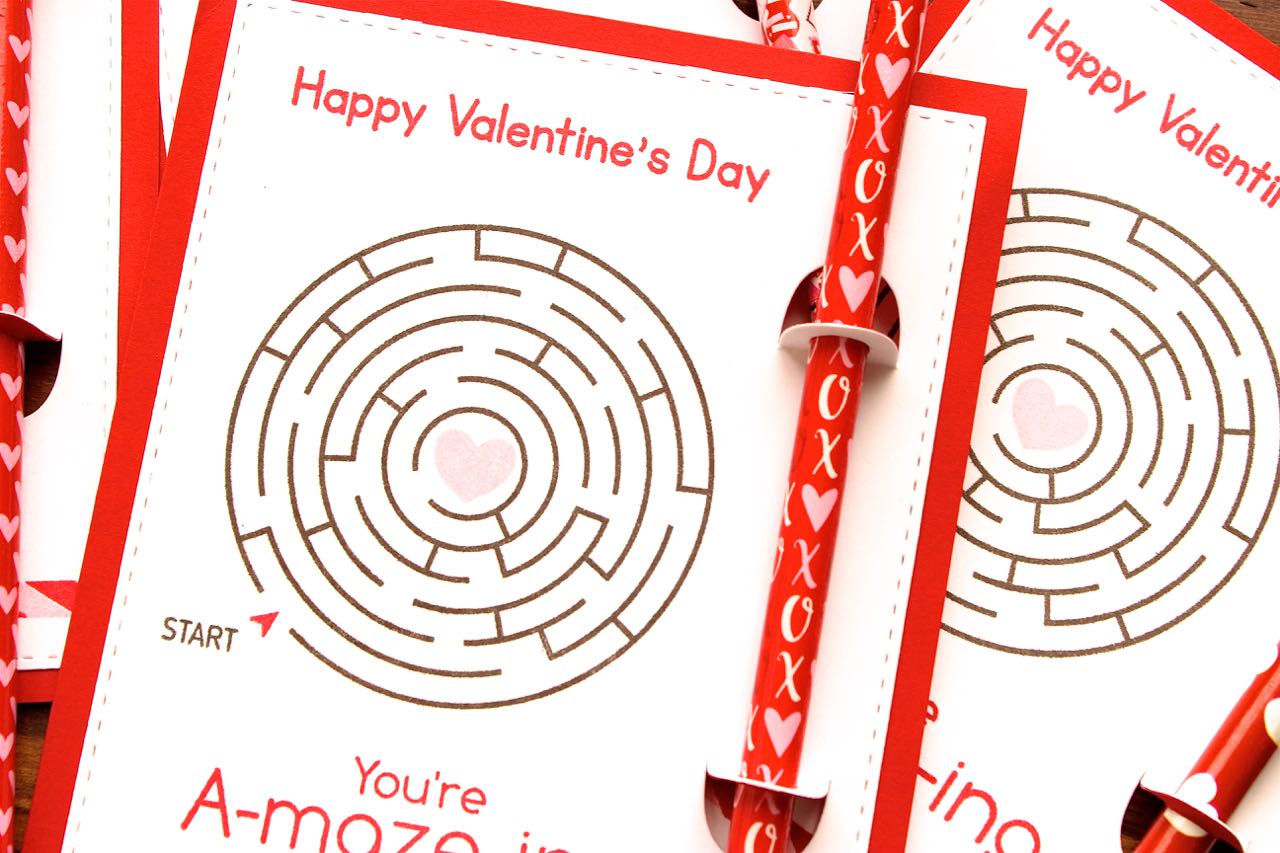
You're A-Maze-ing

Hello! I can hardly believe it but Valentine's Day is quickly approaching. I've been busy making Valentines for my kids' classroom parties and will share those soon. In the mean time these are actually what I made for them to give to their classmates last year and I never posted, so here you go!

I combined a bunch of different sets to create these fun maze themed Valentine's last year. I actually have maze sets from two different stamp companies, and used them both! The main maze is from a Papertrey Ink set called The A-Maze-ing Stamp Set, and it is currently on clearance for just $5!

The sentiment at the bottom is from a retired My Favorite Things set called You're A-Maze-ing. The little arrow at the start of the maze is from another MFT set called Interactive Labels. And the stripes down at the bottom are actually an airmail stripe image from a PTI set called Love You to Pieces: Airplane

The pink heart in the middle of the maze is also from the MFT set You're A-Maze-ing. 

The sentiment at the very top is another retired stamp set, called Keep it Simple: Valentine. 

One of my favorite parts of the project is the die I used to attach the pencil to the Valentine! It is a die from Papertrey Ink called Write Stuff Holders. There are two dies in the set, one is sized to hold a crayon and the other is sized to hold a pencil, so fun! These were quite a bit of work (so much stamping for a mass produced project!) but I love how they turned out and the kids really had fun with them. I'm almost done with this year's Valentines and will hopefully share those soon. Thanks for reading and have a great weekend!
 

SUPPLIES:

Stamps: You're A-Maze-ing, Interactive Labels (MFT), The A-Mazing Stamp Set, Love You to Pieces: Airplane, Keep it Simple: Valentine (PTI)

Paper: White, Red (Michael's)

Ink: Real Red, Pink Pirouette (SU!), Versa Fine Onyx Black

Dies: Write Stuff Holders (PTI), Stitched Rectangles (SSS)

Monday, January 25, 2021

Wishing You a Sweet Day

I'll be sharing lots of birthday cards in the coming weeks. Now through March there is a steady stream of birthdays among my family and friends! This card is destined for a crafty friend from my church and uses the Cupcake and Sprinkles die-namic. My last card used the Mini Cupcake Maker die-namic, and today's card uses the full size cupcake. Both sizes are super fun!

The cupcake is adhered to an Essentials: Braided Oval die cut from Lilac Grace card stock. I love how pretty and intricate that die cut is! The cupcake wrapper was cut from pattern paper and the frosting was die cut from white card stock. I went over the frosting with a Wink of Stella pen to add some shimmer. The sprinkles are cut from Lilac Grace and gold card stock. 

I used the Twisted Crepe die to add a festive touch to the top of the card. I die cut the streamers from white card stock and, using a finger dauber, added Wilted Violet distress oxide ink. I alternated between full saturation and a very light tough to give it the variegated look. 

The background panel was created by splattering a white card stock panel with Shaded Lilac and Wilted Violet distress oxide inks and then I cut it down with the largest Crimped Frame die. Finally, I stamped the sentiment, from Sugar Coated Sentiments, with Wilted Violet ink at the bottom. The entire main panel is popped up with foam tape onto a Lilac Grace card base. It's been fun playing and getting some cards made!

SUPPLIES:

Stamps: Sugar-Coated Sentiments (MFT)

Paper: Lilac Grace, Stamper's Select White (PTI), Spots & Stripes Brights pattern paper (Sugar Pea Designs), gold

Ink: Shaded Lilac, Wilted Violet (Distress Oxide)

Dies: Cupcake and Sprinkles die namic (MFT), Twisted Crepe, Crimped Frame (The Greetery), Essentials: Braided Ovals (Pink Fresh Studio)

Other: Wink of Stella

Sunday, January 24, 2021

Cupcakes & Balloons Birthday Card

My niece turned 4 years old last week and this is the card I made for her. Only after I finished did I realize there is no stamping on this, only die cutting. That might be a first for me!

The background was created by blending Spun Sugar and Picked Raspberry distress oxide inks onto a panel of white card stock, getting lighter toward the edges. I also splattered some water and more Picked Raspberry onto the panel for interest. I then die cut that panel with the Crimped Frame die from The Greetery. I used the super fun Pumped-Up Alphabet die-namic by My Favorite Things to cut my niece's name from gold card stock. I was trying to mimic the oversized gold mylar alphabet balloons that are so popular for birthdays and showers. It is so pretty in real life!

The cupcakes were die cut using the Mini Cupcake Maker die-namic. I used a variety of pink card stock and pink pattern paper for the wrappers. The frosting is all white, and then I used more gold card stock for the sprinkles. I like that there are four cupcakes, and it was her fourth birthday. It just worked out that way because of her name, but I like it! The entire main panel is popped up with foam tape onto a white card base. Happy birthday sweet girl!


SUPPLIES:

Card Stock: Stamper's Select White, Sweet Blush (PTI), Brights & Stripes pattern paper (Sugar Pea Designs), gold

Ink: Spun Sugar, Picked Raspberry (Distress Oxide)

Dies: Mini Cupcake Maker die-namic, Pumped-Up Alphabet die-namic (MFT), Crimped Frame (The Greetery)

Monday, January 11, 2021

Homemade Marshmallow Gifts

I have one last holiday project to share, homemade marshmallows! The idea had been rumbling in the back of my mind to try making homemade marshmallows this year so when King Arthur Flour posted a recipe on their blog around the same time it seemed like a sign! 

Surprisingly it wasn't that difficult to make the marshmallows and they tasted so much better than the store bought ones! The recipe also makes a ton of marshmallows. I had enough to fill these three pint jars and more than enough for my own family to enjoy as well. 

Of course I had to dress up the jars with some pretty packaging. With my pinking shears I cut some Christmas-y flannel I already had into circles for the lids. The tags were stamped with a sentiment from MFT's set Hug in a Mug and tied on with baker's twine. I also added little sparkly silver snowflakes I had leftover from other projects. 


These were delicious on their own and definitely a special addition to our hot cocoa. We even dipped them in chocolate fondue for a special New Year's Eve treat! Next time it would be fun to try some of the flavor variations King Arthur Flour suggests. Maple marshmallows anyone? :) 

Thursday, October 29, 2020

Boo Box Bats


Hello! I'm just popping in with a quick Halloween project I made for my kids. I recently purchased the Boo Box die namic from My Favorite Things when it was on sale, and I have to say this thing is so fun! It was super simple to quickly die cut and assemble these little treat boxes. I used traditional colors for the bat, and just added google eyes. I cut the base from True Black card stock, and it is very sturdy and actually holds quite a bit of candy. I'll have these at the boys' places at the table when they wake up on Halloween morning as a fun surprise. 

Happy Halloween!


SUPPLIES

Dies: Boo Box die namics (MFT)

Card Stock: True Black, Stamper's Select White, (PTI), red, pink (generic)

Other: google eyes

Sunday, September 13, 2020

To the Coolest Pop in Town

This is the card I made recently for my Dad's birthday. He and my sister used to make and bottle their own soda, so I thought this was fun! I used a retired My Favorite Things set called Soda Pop

To create the background I started by trimming a piece of white card stock to 5 1/2" x 4 1/4". I wanted the background colors to resemble cola so I blended distress oxide inks in Ground Espresso, Rusty Hinge and Fossilized Amber. I started dark in the lower left corner and worked my way up into the lighter colors. Once my ink blending was done, I added some splatters of water to resemble carbonated bubbles. After my water splatters were dry, I die cut my panel with the largest Crimped Frame die from the Greetery. 

Using the coordinating dies, I die cut the Coke bottle from white card stock and, using Zig Clean Color markers, did my best to color it in. I also die cut the Coke bottle a second time from a piece of clear scrap acetate and put it over my colored bottle so it would look like glass.The label and bottle cap are cut from red card stock, with the label's sentiment embossed in white.  

Finally, the sentiment, also from the set, was embossed in white in the lower corner. This was super fun to make and I hope my Dad liked it!

Thanks for reading!


SUPPLIES:

Stamps: Soda Pop (My Favorite Things)

Paper: Stamper's Select White (PTI), Real Red (SU!)

Ink: Ground Espresso, Rusty Hinge, Fossilized Amber (Distress Oxide), Versa Mark,

Dies: Soda Pop Bottle die namics (MFT), Crimped Frame (The Greetery)

Other: Zig Clean Color markers, white embossing powder, clear acetate


Saturday, April 4, 2020

HELLO

Hello friends! We have now logged three weeks of quarantine in our little corner of the world and, though we are all grateful to be safe and healthy, starting to get a bit stir crazy and missing our social interactions. To bridge that divide, what better way then to send some cards! I've been busy making a stack of happy mail to send out to friends and the moms in my MOPS group to hopefully brighten their day and let them know we're all in this together. My inspiration came from this card by The Stamp Market. I used their Perfect Polka Dot stamp for the background, stamped in Versa Mark and embossed in white. It really does perfectly fill up the front of an A2 card! 

My letters are die cut from MFT's Impact Alphabet die namic. I love the large size! The card stock colors I used are Raspberry Fizz, Limeade Ice, New Leaf, Aqua Mist and Hawaiian shores, all from PTI. They are adhered with foam tape to give them extra dimension.

On the back I stamped a sentiment from Made With Love by Sugar Pea Designs.

The envelope got some love, too! The sentiment is from PTI's Keep it Simple: Happy Mail mini set.

I love how bright and cheerful these turned out. I hope the recipients love them, too!

SUPPLIES
Stamps: Perfect Polka Dot (The Stamp Market), Keep it Simple: Happy Mail (PTI), Made With Love (Sugar Pea Designs)
Paper: Raspberry Fizz, Limeade Ice, New Leaf, Aqua Mist, Hawaiian Shores, Kraft (PTI)
Ink: Smokey Shadow (PTI), Versa Mark
Dies: Impact Alphabet die namic (MFT)
Other: chartreuse envelope (Paper Source), white embossing powder, foam tape