Saturday, March 7, 2020

Hope Your Birthday Rocks!

My eldest son recently turned 7 years old, and to celebrate he wanted a geology themed birthday party. This was actually a very cool and fun theme!  Of course Papertrey Ink's Geode Layers die, along with the Text & Texture: Agate stamp set, were perfect for his card.

Having a February birthday means that his birthstone is amethyst, so I chose to use a purple and gold color scheme for his card. It also ended up being the color scheme for his party, so it all coordinated! I started with gray for the outer layer of the geode, then mixed in various shades of purple alternating with gold card stock. The background is also embossed in gold. I went back over all of the purple layers with my Wink of Stella pen, this card really sparkles and shines in person!

The sentiment was stamped in VersaMark ink onto a strip of vellum card stock, then heat embossed in gold. I wrapped the vellum all the way around the card front and adhered it behind the front panel with Score Tape. 

Here you can really see the shimmering effect. Happy birthday to my big kid!


SUPPLIES:
Stamps: Text & Texture: Agate (PTI)
Paper: Stamper's Select White, Soft Stone, Vellum (PTI), purple (Michael's), gold
Ink: VersaMark
Dies: Geode Layers (PTI)
Other: gold embossing powder, Wink of Stella

Monday, March 2, 2020

To Infinity and Beyond!

This past weekend we celebrated my nephew's 1st birthday and the theme of his party was Toy Story. I knew the perfect set to use for his card, Boy Basics: Out of This World! My layout was inspired by this card. The focal panel was cut from Stamper's Select White card stock with the Simon Says Stamp Stitched Rectangles die. The circular window was cut using My Favorite Things Inside Out Stitched Circle STAX. I also cut a circle from the card base, so the window went all the way through to the inside of the card.

The sentiment was stamped in Versa Fine Onyx Black ink and then embossed with clear powder to give it some shine.

I die cut the rocket ship from Stamper's Select White card stock with the coordinating die. Then I used Zig markers to color it in with Buzz Lightyear inspired colors. To create the faint grey radiating lines I used a stencil from the Make it Market Mini Kit: Out of This World and blended Weathered Wood Distress Oxide ink.

The blue starry sky was created by blending Chipped Sapphire and Blueprint Sketch distress oxide ink onto a panel of white card stock. I then die cut the starry circle from Scene It: Skyscapes die collection and used a glue stick to glue it inside the card, aligned with my stitched circle cut from the front panel. I cut the starry circle a second time from silver card stock and inlaid the silver stars into the blue circle.

The rocket was attached to the front panel, and the panel was attached to the card base with foam tape. Here you can see the dimension and peek-a-boo window.

The inside was simply stamped with an appropriate sentiment from the Wishes Come True set.


SUPPLIES:
Stamps: Boy Basics: Out of This WorldWishes Come True (PTI)
Ink: Chipped Sapphire, Blueprint Sketch, Weathered Wood (Distress Oxide), Versa Fine Onxy Black, Versa Mark
Paper: Stamper's Select White (PTI), silver
Dies: Rocket dieScene It: Skyscapes (PTI), Inside Out Stitched Circle STAX die namics (MFT), Stitched Rectangles (Simon Says Stamp)
Other: Stencil from Make it Market Mini Kit, Out of this World (PTI), Zig Clean Color pens, clear embossing powder, foam tape

Tuesday, January 28, 2020

Happy Birthday Princess

We recently attended my niece's 3rd birthday party, and her theme was princesses! I was thrilled because, having two boys, I don't often get to make a princess card. I used Papertrey Ink's set Little Princess, which is on sale right now for a steal! I stamped the castle in Spun Sugar Distress Oxide ink and embossed the details in gold. The castle die cut is popped up with foam tape and mounted to an Essentials: Braided Oval die from Pink Fresh Studio. I really love the detailing of that die!

Behind the castle I blended Rusty Hinge and Fossilized Amber Distress Oxide ink, going deeper with the Rusty Hinge nearer the castle.

The oval die is also popped up with foam tape on a panel of Pink Pirouette card stock cut from one of the dies in the Noted: Scalloped A2 Vertical die collection. I wanted to add some subtle pattern to that layer, so I also blended Spun Sugar ink over the Stencil Basics: Dots to add some interest.

I'm not a big fan of my own handwriting, so to address the envelope I stamped my nieces's name in Versa Mark ink using the Penned Elegance Alphabet set and embossed it in gold. I love that it matches her card!

Here are the card and envelope together.

This last photo does a better job of showing all of the gold embossing details. This was so fun to make!

SUPPLIES:
Stamps: Little Princess, Penned Elegance Alphabet (PTI)
Paper: Stamper's Select White (PTI), Pink Pirouette (SU!)
Ink: Spun Sugar, Fossilized Amber, Rusty Hinge (Distress Oxide), Versa Fine Onyx Black, Versa Mark
Dies: Little Princess, Noted: Scalloped A2 Vertical (PTI), Essentials: Braided Oval (Pink Fresh Studio)
Other: Stencil Bascis: Dots (PTI), Rainbow Garden Assortment Envelopes (MFT), gold embossing powder, foam tape

Friday, January 10, 2020

Paperwhite Neighbor Gifts

This Christmas we gave our neighbors gifts of blooming paperwhites. I thought that was a fun alternative to sweets that probably wouldn't get eaten, and live plants just bring so much beauty, especially in the winter. 

I found the bulbs for sale in glass vases at Trader Joe's. They weren't yet blooming when I bought them, but I picked plants that already had buds forming or that looked to soon bud, and hoped for the best by Christmas!

The gift tags I made for them are actually the Mat Stack #4 die from Papertrey Ink, but I punched a hole in the top to turn it into a tag.

The little house is stamped from PTI's Tinsel & Tag House Additions set. The large "Merry Christmas" sentiment is from Sentiment Staples: Christmas, as well as the smaller "From our home to yours".


SUPPLIES:
Ink: Pure Poppy (PTI), Mowed Lawn (Ranger Distress Oxide), Versa Fine Onyx Black
Die: Mat Stack #4 (PTI)
Other: Crop-a-dile, red satin ribbon


Tuesday, January 7, 2020

Christmas Gifts: Coffee Gift Card Holders

I know we are into January but I had a couple of projects from Christmas that I didn't have a chance to share before the holidays were over. Ever since I bought the Coffee Cup Gift Card Holder from Honey Bee Stamps, I've been itching to use it! I was planning on giving my son's bus driver and one of his teachers Starbucks gift cards for Christmas, so this was the perfect opportunity to try it out. 

I've also been very into buffalo plaid during the holidays lately, so I thought it would be cute to dress the coffee cups up in that pattern. I used Papertrey Ink's Background Builder: Super Gingham set to achieve that look. I stamped the larger gingham stamp in Smokey Shadow ink onto red card stock. It only took me two impressions to cover the front of the cup, and fortunately the cup sleeve covers up any imperfections I may have had in lining them up!

Speaking of the cup sleeve, I thought the sentiment from Cup of Cheer was just perfect for a coffee gift card! The snowflakes and fun little swirls are from Quilted: Winter, and they are all embossed in white.

The lid is die cut from white card stock, and I added the smaller of the two holly leaves from the Holly Jolly die collection. The berries were added with red glitter glue.

Inside I added the gift card and a simple sentiment, also embossed in white. I think they turned out super cute! I hope the recipients liked them!


SUPPLIES:
Paper: Real Red, Garden Green (SU!), Kraft, Stamper's Select White (PTI)
Ink: Smokey Shadow (PTI), Versa Mark
Dies: Coffee Cup Gift Card Holder (Honey Bee Stamps), Holly Jolly (PTI)
Other: white embossing powder, red glitter glue


Friday, September 13, 2019

Have a Magical Birthday

My oldest son was recently invited to a birthday party for a girl in his class and this is the card I made for her. I decided to use Pink Fresh Studio's set Magical Unicorn. This is one of my only young girl type stamp sets, but I really love it!


The flowers, leaves, ears, and unicorn horn are all cut with the matching Magical Unicorn dies. The horn was embossed in gold, and the leaves and flowers were stamped with their coordinating stamps from the set. The ears are only glued on at the base, and then I sort of curled them up a bit for some dimension.

I used the Essentials: Braided Oval die to layer all of my unicorn pieces on. My inspiration for the layout came from the very talented Kelly Lunceford, who did the same thing on her card.

I stamped the eyelashes directly on the oval die cut, and then embossed the sentiment in gold. The oval is popped up with foam tape over a piece of polka dotted pattern paper that is from a very old Stampin' Up! pad I've had forever. I think it turned out very cute and I hope the little girl liked her card!

Have a great weekend!


SUPPLIES:
Paper: Stamper's Select White (PTI), Pretty in Pink, Certainly Celery, pattern paper (SU!)
Ink: Pretty in Pink, Certainly Celery (SU!), Versa Fine Onyx Black, Versa Mark
Other: gold embossing powder, adhesive pearls, foam tape

Thursday, August 29, 2019

First Day of School Cards


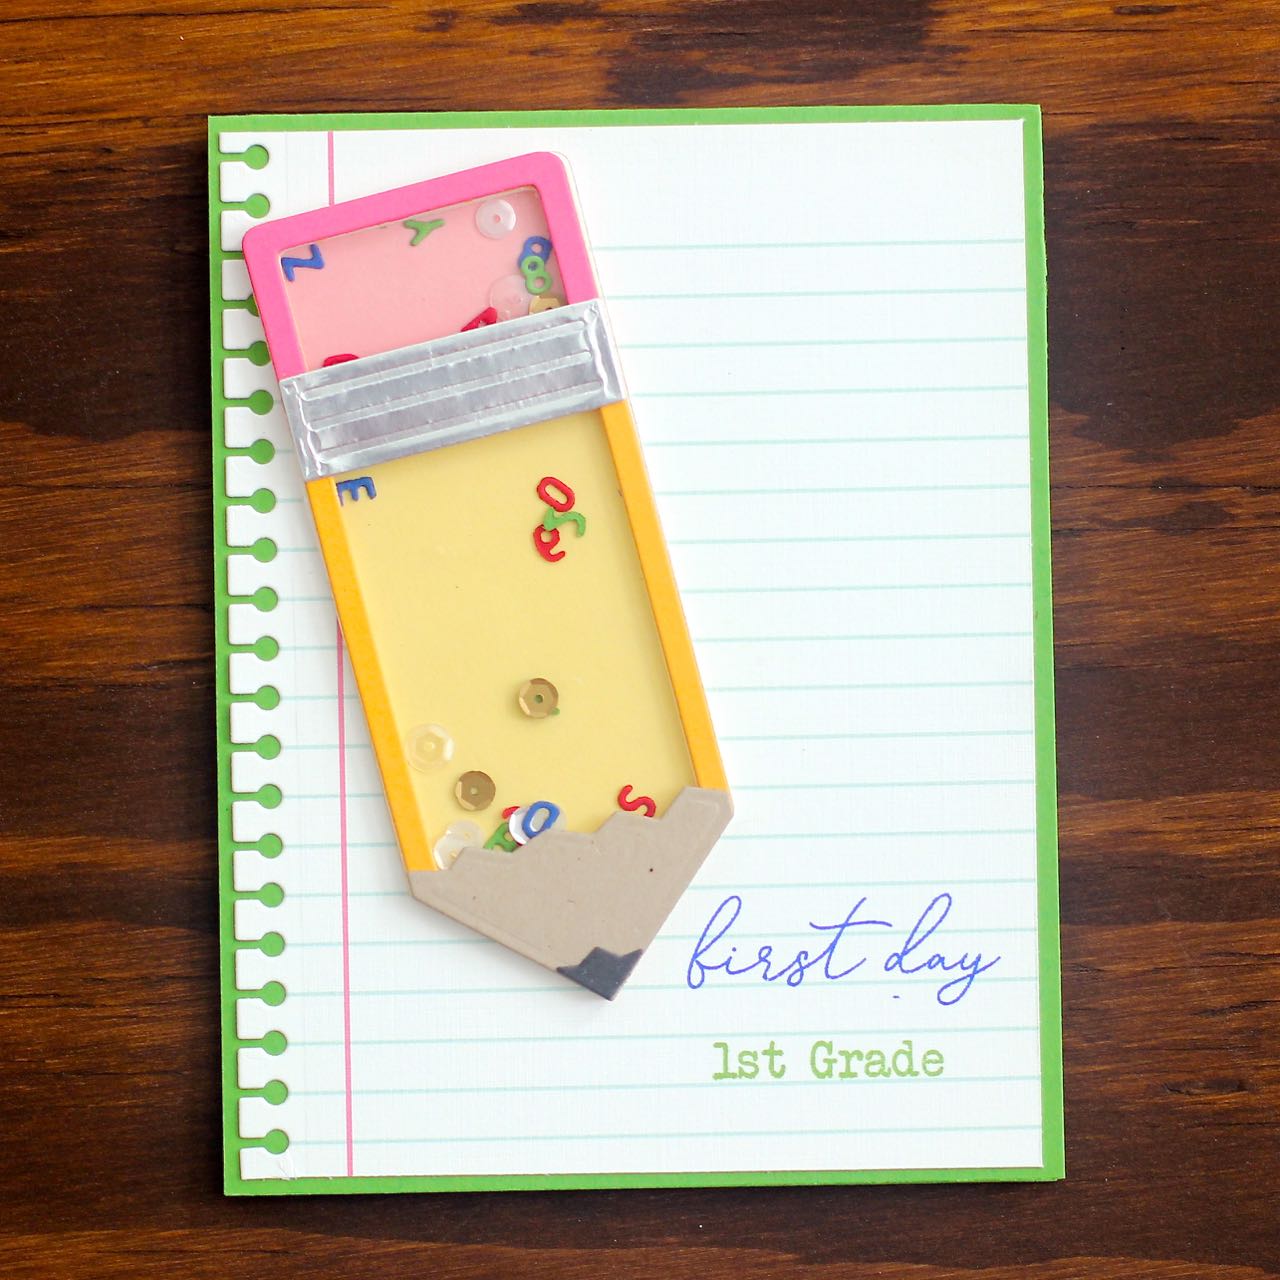
My last post was for teacher appreciation gifts and now I am posting back to school cards; summer certainly flew by! I wanted to make some special cards for each of my boys to celebrate their first day of school, and what better way than with a fun shaker card?

My oldest had his first day of school last week, I now have a first grader! Both cards center around the Shaker Shapes: Pencil die from Papertrey Ink. So fun! I die cut the pencil from traditional colors and filled it in with little alphabet confetti, cut from a die that is included with the shaker die set. There are also a few gold and clear sequins.

The words "first day" are from School Days and "1st Grade" is from School Time Additions. I really love the additions set because it includes everything from preschool to senior, I'll be using this one for a long time!

To give the shaker dimension and hold everything together, I used double sided foam adhesive sheets. These are a life save and make shaker cards to much easier than piecing together little bits of foam tape!

The notebook paper is actually pattern paper called Pencil Me In, also from Papertrey Ink. I added the spiral edge with the Moments Inked: Edged die. I gave this card to my son at breakfast on his first day of school and he loved it! I hope it made the day a little more special and calmed any first day jitters.

This next card I will give to my three year old when he has his very first day of preschool next week. Everything about this card was done the same way, only I switched out "1st grade" for "preschool" and reversed the colors. 


I hope this provides some inspiration and if you have kiddos going back to school as well I hope they have a great year!


SUPPLIES
Stamps: School Days, School Time Additions (PTI)
Paper: New Leaf, Hibiscus Burst, Sweet Blush, Summer Sunrise, Harvest Gold, Kraft, Smokey Shadow, Pencil Me In (PTI), Brilliant Blue, Real Red (SU!), silver
Ink: Brilliant Blue (SU!), New Leaf (PTI)
Dies: Shaker Shapes: Pencil, Moments Inked: Edged (PTI)
Other: sequins, doubled sided foam adhesive sheets, 1/8" score tape, clear acetate